If you’re like most of us, you’ve spent all your money on the gear for a recording studio. Now you have to figure out how to design the recording and control rooms so they look good without spending much money. Below are some recording studio design ideas that can work for home and project studios. You can find the materials in any hardware store and online.
Related Post: DIY Recording Studio Acoustics
In this article we’ll cover three recording studio design ideas: Boundary Lighting, Ceiling Fabric, and Two-Tiered Control Room Platform.
Recording Studio Design Idea 1: Boundary Lighting and Molding

Rope lights and wood molding (metal could work too, it it matches the studio vibe). We are thankful for LED lights not just for optical audio compressors, but because they can give us low-voltages, low-heat rope lights. By themselves it makes you think you’re in the bedroom of a teenager rather than in a recording studio, but if you use them as boundary lighting, it can give a cool vibe to your recording studio without costing you much.
You need cheap wood molding. It does not have to be fancy. In fact, usually the more plain it is, the better. You can either paint it or stain it so that it compliments the colors you already have in your recording studio design.
You need LED rope lights / tape strips. These are incredibly cheap now and 99% of the time you don’t have to worry about them adding any noise to your system (but be careful of adding dimmers).
You need finishing nails to mount the molding, and mounting brackets to mount the rope light (like those plastic things with a single nail you use to mount a cable along a wall).
How much do you need? The idea is to use light to outline spaces in your studio. You can outline a window, the entire floor and/or ceiling, or a certain wall. Look at your space, imagine what sort of pattern would not only look cool, but could be used as alternate mood lighting, then buy a few extra feet above that measurement.
What do you do to install? The purpose of the molding is to hide the rope light. You do not want to see the rope light itself, but put it behind so that the light reflects off the surface (floor, ceiling, wall). Measure and mount the molding so that it has enough space behind it to line with the rope light. Depending on where you want it, the angle will vary, but if you can record a drum kit, you’re smart enough to figure out how to do the rest from here.
Recording Studio Design Idea 2: Fabric On Ceiling
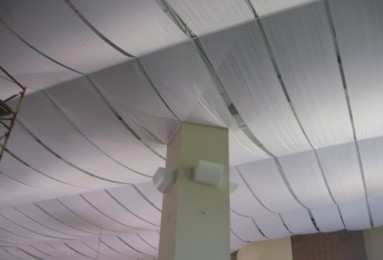
Most fabric by itself will not help you much with acoustics (at best, the expensive stuff will help some with high frequencies). If you’re looking for just studio design ideas, then you can do some interesting things by heading to the garment district and buying a couple rolls of inexpensive fabric in colors that match your studio design colors, then create a patter and some depth by mounting it on the ceiling.
- Think about two fabric colors. Not vital, but that allows you to contrast a little bit as well as compliment whatever colors are on the studio and control room walls. If you’re not very good with matching / complimenting colors (like me), then stick with one to be safe.
- 2×1 inch wood slats and screws. You’ll screw the slats into the ceiling which holds the fabric in place. Mounting this way allows you to stretch the fabric or allow it to hang loosely, plus create a bit of a pattern if you want.
- How much fabric do you need? It depends on one thing: are you stretching it, or allowing it to droop and bow like waves or rolls?
- If you want to stretch the fabric on the ceiling, then you need about 5% more than the total surface area to be safe (it could be more: the it depends on the width of the fabric, so do your math first!). WIth this option, we’d also recommend going to uHaul or a packing company and buying some dense packing blankets: nail / screw those to the ceiling first. Those are pretty dense and will help a little with sound. Once those are up, then you can stretch the fabric and secure it by putting up the wood slats in equal intervals (ever 3 feet or so).
- If you want the fabric on the ceiling to bow, then you need more fabric. Assume 1.5 to 1.75 times longer than if it were flat on the surface of the ceiling. You can also put packing blankets on the ceiling, but they won’t be perfectly hidden by the fabric at seem points, so you would want to paint the blankets black before putting the fabric up. To mount, secure one end of the fabric at an edge of the studio room. Take the first wood slat, pull it under the fabric, and move the wood slat where you want it to be on the recording studio ceiling. Let the fabric slide through until it has the look you want and then screw the wood in (be careful, the screws can bind the fabric).
- Remember, thin fabric doesn’t do much at all for acoustics. If you have a really high ceiling, though, this design idea can also hide real acoustic treatment you have on the ceiling above the fabric curls (i.e. vertical and horizontal baffles and panels).
Recording Studio Design Idea 3: Control Room Riser, Two Levels
Floating the floor in an entire room is ideal, but the materials can get expensive. Recording studio design is often about being different and unique – so people will pay more to record there rather than in their friend’s garage where they might even be using some of the same recording gear. If you can make your control room look as professional as possible, you have a much greater chance and pulling in clients. There’s a reason recording studio control rooms all have a producer’s couch: it makes them feel more important ;) With that in mind: why not increase the height a little bit, too?
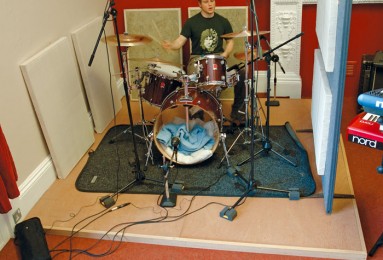
The raised control room platform concept: you’ve probably seen a wood floor in a room that’s surrounded by carpet – usually something like a dance floor or a drum riser (pictured). Just apply that “partial room” floating to a control room. You can shape it to give the recording studio some extra style and give the control room more of a 3-dimensional feel. Picture the room first: where the console is, the rack gear, the couch, then draw a platform (front to back of the room) on two levels: one for the console, then raised another 6 inches for the rack and producer’s couch. That leaves carpeted areas along the side. This separates the working audio engineer a bit, and when the band is in the control room their much more likely to hang out on the raised couch area rather than standing right beside you breathing down your neck at the console. The shape of the platform can vary, and the materials are actually cheap. If you plan ahead, then you can also frame the floor with a cable trough and leave a hatch to hide your cables from the console to the rack.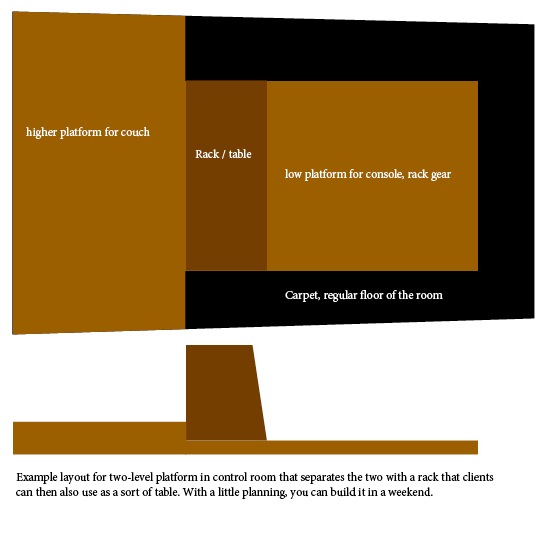
- Wood slats. Use 2x4s for the lower platform, and 2×6 or 2×8 for the higher portion for the producer / artists. None of these are seen, so you can buy cheap wood so long as their straight. The 2×4 you can lay flat so the lower part of the riser is just barely raised compared to the foundation floor. Once you draw what the shape will be, plan at most 10-inch spacing between your floor joists, plus some cross joints so the floor won’t bow. The process is actually really easy once you draw what you want on paper. With a skill saw and a friend you can do it in a weekend.
- Plywood. For the floor itself.
- Flooring underlayment (foam rubber sort of stuff). Since you’re not putting a subfloor on this platform, it just has to run along each joist.
- Thickest rock wool you can afford to fill the gaps between the floor joists. (This is one of the more expensive materials, but you can get creative with other replacement materials at bigger Good Will stores).
- Optional, but ideal: neoprene pucks to float the floor. You can also look around at industrial supply stores to get materials they use for mounting big HVAC equipment, then cut it into the size you need to separate the joists from the floor.
- Hardware: screws, and rubber corner molding you can put on the edges of the platform (for safety and to make the edges look clean and straight).
- Dark stain or paint and some floor polyurethane. Since we’re not putting finishing wood on top of the platform, you’ll be looking at cheap looking plywood. A very dark stain will mask that. A couple days after the stain or paint is dry, put on a few coats of polyurethane. Let that dry for another couple days, then sand it to smooth the floor and dull the finish a little.
- At first it sounds like a lot of work, but it really isn’t A trip to Home Depot to learn some about framing a floor and you’ll be good to go. If you do it yourself, the materials cost can be only a couple hundred dollars (you’ll easily make that back with one paid session).
- Note: think about how to also integrate lighting as you build the floor.
Published: by | Updated: 06-19-2014 17:54:35